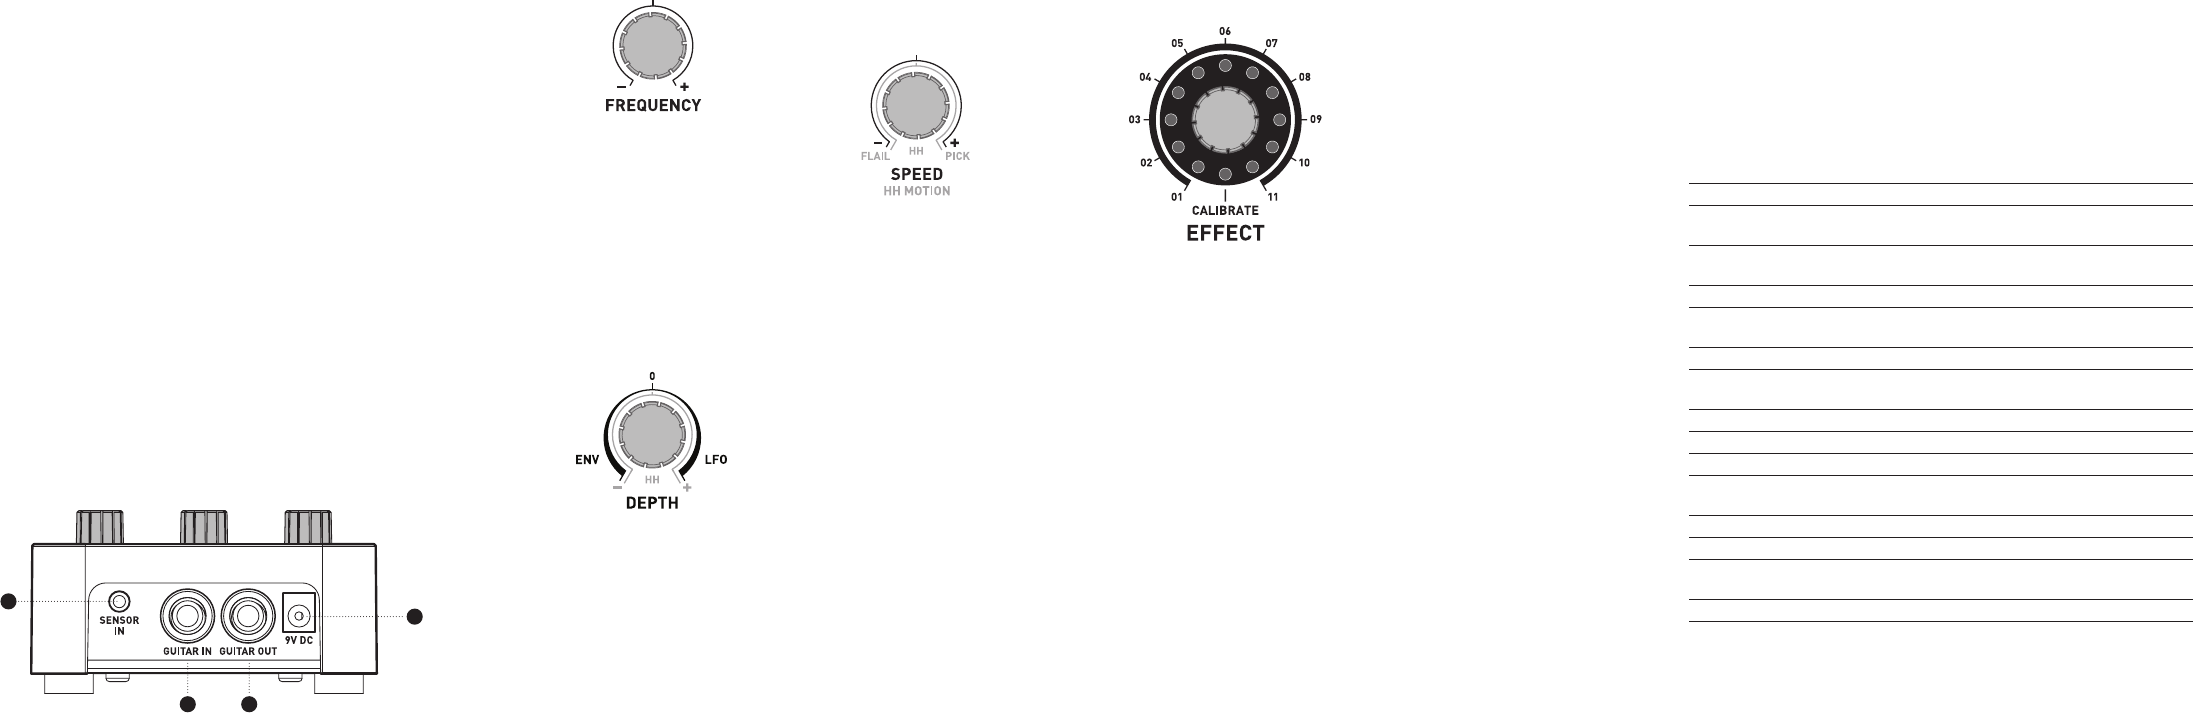
The effect knob selects the type
of phaser to be used. The effect
knob also allows you to select the
CALIBRATE mode for calibrating the
signals from a Hot Hand sensor. See
the Use with Hot Hand section for
details on calibration.
The frequency knob sets the center
frequency of the phaser sweep. Turn-
ing the knob counterclockwise will
result in the phaser notches moving
over lower frequencies. Turning the
knob clockwise will result in the
phaser notches moving over higher
frequencies. This control is also use-
ful for adjusting the frequency range
to match another instrument such
as a bass guitar or keyboard.
The depth knob is a multi-purpose
control on the Tri-Mod Phaser. It
controls the depth of the effect and
additionally controls the type of
modulation being used. The control
is broken down into two regions. To
the left of the ‘0’ position (12 o’clock)
the effect will be driven using an
envelope follower. Turning the knob
further to the left will increase the
depth of the envelope. To the right
of the ‘0’ position the effect will be
driven using an
LFO. Turning the
knob further to the right will increase
the depth of the
LFO. This way you
can easily switch back and forth
between using the envelope or
LFO to
drive the effect.
Note: If you plug a Hot Hand sensor
in the
SENSOR IN jack both the enve-
lope and
LFO modes will be disabled
and the unit will be put into Hot Hand
Mode. See the Use with Hot Hand sec-
tion for more details.
In envelope mode, the speed knob
controls the attack and decay time
of the envelope with ‘-‘ being the
slowest and ‘+’ being the fastest. In
LFO mode, it controls the speed of
the oscillator again with ‘-‘ being the
slowest and ‘+’ the fastest. In Hot
Hand mode, the knob controls the
response of the motion sensor. See
the Use with Hot Hand section for
more details.
Note: The envelope follower signal
can be reset to zero by a very brief
moment of silence, allowing the next
note played to experience the full
sweep of the envelope all the way
from zero.
The ON/OFF switch engages or dis-
engages the effect. When the effect is
engaged, the
ON/OFF LED will be lit.
The
LED will be off in bypass mode.
The
ON/OFF switch is also used to
start the calibration routine when the
EFFECT knob is set to CALIBRATE.
See the section on Use with Hot Hand
for more details.
Here are some brief descriptions of
the effects included in the Tri-Mod
Phaser. The type of modulation used
to control the effect, either Envelope,
LFO, or Hot Hand, can create dramat-
ically different sounds for the same
effect setting. We encourage you to
experiment with different combina-
tions to nd what you like best.
A model of one of the oldest
rotating speaker simulators.
2 notches, but one is such low
frequency as to be nearly inaudible.
No resonance.
Standard 2 notch. Some reso-
nance.
Standard 3 notch. No resonance.
Standard 4 notch. Some reso-
nance.
Standard 6 notch. Some reso-
nance.
6 notch, but shifted signal sub-
tracted from input rather than added.
Produces a hollow sort of sound.
No resonance.
2 notch, but 6 peaks. More
resonance.
12 notches. Why? Because we
can. Hollow sound, more resonance.
3 notches, more resonance.
The feedback loop that creates the
resonance peaks has some extra
delay in it, giving a more complicated
frequency response curve, with
more peaks.
6 notches, more resonance.
Longer delay in feedback loop.
12 notches, more resonance,
hollow sound. Very long delay in
feedback loop.
Noise:
Low Power Change batteries or plug in a DC power supply.
Near noise source Move pedal away from power supplies and other
equipment.
Other equipment Remove other effects from signal chain,
see if noise persists.
Bad cables Swap out audio cables.
Low volume:
Low power Change batteries or plug in a DC power supply.
Hot Hand doesn’t work:
Low power Change batteries or plug in a DC power supply.
Not calibrated properly Calibrate the Hot Hand (see Use with Hot Hand).
Not connected Check Hot Hand connections.
Knobs don’t work /light up:
Low power Change batteries or plug in a DC power supply.
Wrong power supply Use correct power supply (see Quick Start).
Corroded input cable plug Check input cable plug for corrosion on sleeve,
swap out cable if necessary.
TRS (stereo) cable used Only use mono cable for input cable.
For additional assistance, please visit www.sourceaudio.net
Dimensions
• L: 7 inches
• W: 4 inches
• H: 2 inches (including knobs)
Weight
• 1.25lbs
Power
• 110mA @ 9V DC (max 145mA
with Hot Hand Wireless Adapter)
• 15-20 hours battery life
• NEGATIVE tip power jack
Audio Performance
• 115dB DNR audio ADC
•
24-bit audio conversion
• 56-bit digital data path
• Analog bypass
To power the unit, insert 4 AA batteries (included) or connect a
Source Audio SA150 9 Volt DC power supply to the 9V DC jack (A).
Note: Power supply must be REGULATED, minimum 200mA, and use a
negative tip plug. Use of a non-Source Audio power supply may cause
damage and void the warranty.
Next, plug your guitar (or other instrument) into the jack labeled
GUITAR IN (B) via a standard ¼-inch cable. Connect your amp (or
other audio device) to the GUITAR OUT (C) jack, again with a standard
¼-inch cable. Both input and output are mono signals.
Note: The unit will not power up until a MONO ¼-inch plug is inserted into
the guitar input. This is to conserve power when the unit is running on bat-
teries. Don’t forget to unplug the cable from the input when the unit is not in
use—otherwise the batteries will continue to drain.
To use your Tri-Mod Phaser with a Hot Hand sensor: Connect the
sensor to the SENSOR IN (D) jack and follow any instructions sup-
plied with the sensor. The sensor input works with both wired and
wireless sensors.
(see Controls section for more details)
• EFFECT selects desired effect type.
• FREQUENCY adjusts the center frequency of the phaser.
• DEPTH controls the depth of the envelope (left of center) or
the depth of the LFO (right of center).
• ON/OFF engages and disengages the effect.


 (48 Seiten)
 (18 Seiten)


 (84 Seiten)
 (12 Seiten)
 (24 Seiten)
 (52 Seiten)
 (36 Seiten)
 Manymanuals.com
 Manymanuals.de
 Manymanuals.fr
 Manymanuals.it
 Manymanuals.pl
 Manymanuals.cz
 Manymanuals.es
 Manymanuals-pt.com
Comments to this Manuals